17348 MINI FIGURE HAT, NO. 23 pattern


17348 MINI FIGURE HAT, NO. 23 pattern
#1
https://library.ldraw.org/tracker/34517

i see now the review of this submitted part...
"I would like to be able to solve the various highlighted issues. Can someone provide me with guidance? I may have been hasty Confused
Reply
RE: 17348 MINI FIGURE HAT, NO. 23 pattern
#2
1. download the part (to get the edits back to your local folder)
2. open in LDPE and save as 17348p01.dat (is this part printed or dual moulded?) and change title to "... with (color) pattern"
3. open the first part (17348.dat) again and uncolor it (everything in color 16)
4. upload both
--> like your cat, these parts need an uncoloured and a coloured version
(maybe someone else has more tips)
(there are more issues, but these will be fixed separately)
Reply
RE: 17348 MINI FIGURE HAT, NO. 23 pattern
#3
Hello Dario,


Let's see how to get a Hair-Piece respectively a Headdress ready for the partstracker. A few things are important:

1.) The piece may not intersect with the head when worn normally, i.e. put straight on the head
2.) The piece may not intersect with neckwear or shoulderpieces it is usually worn with (usually: e.g. comes as a minifigures including these pieces)
3.) Add proper primitives (anti-stud) to the part to make it easy for connection seeking software to do so. 
4.) sort out geometrical issues like flipped triangles, get it as far as possible to a 16 sided geometry
5.) identify printed areas and subfile them

so how does the pieces 17348 look? The outside looks fine so far, just nees edge and conditional lines. I have attached files that contain them already.
Reply
RE: 17348 MINI FIGURE HAT, NO. 23 pattern
#4
the main focus needs to be on the 17348s01:
- we need to add the anti-stud
- we need to fit it the head (3626.dat)

Here's the geometry that need to be replaced with the primitive:

.png   00_AntiStud.PNG (Size: 42.71 KB / Downloads: 126)

When we measure the anti-stud in the source, we see that it is roughly 4,5 LDU deep and the rim of the anti-stud is roughly 3 LDU. We can therefore not use a standard stud4 as it has a rim of 2 LDU, we need to combine some primitives:

1 14 0 -4.5 0 1 0 0 0 -1.125 0 0 0 1 stud4o.dat
1 14 0 0 0 1 0 0 0 -1 0 0 0 1 4-4ring8.dat
1 14 0 0 0 9 0 0 0 -4.5 0 0 0 9 4-4cylo.dat

Let's delete the original data and we see that there arre gaps now:
       

Now we need to close those gaps. The back side pocket is pretty deep in the original part, but it has no funtional purpose, so we can flatten it.
We can start adapting to the head.
Reply
RE: 17348 MINI FIGURE HAT, NO. 23 pattern
#5
If we put the head into the file,
Code:
1 1 0 0 0 1 0 0 0 1 0 0 0 1 3626.dat

we can see that we have some work to do, everywhere we see the blue head, the geometry needs to be adapted to properly fit

.png   10_Head.PNG (Size: 35.73 KB / Downloads: 120)

The head is basically a cylinder with a radius of 13 LDU so we can work with a mock-up.
We do not need to modle the torus of the head-shape as most parts simply don't use it as well, we can use cones that will fit our purpose. Namely a con3 and a con12 which get us to the 13 LDU radius. In order to fit the torus of the head we need to extend the cylinder a bit.

Code:
1 14 0 17 0 13 0 0 0 -15 0 0 0 13 4-4cyli.dat
1 14 0 2 0 1 0 0 0 -3 0 0 0 1 4-4con12.dat
1 14 0 -1 0 3 0 0 0 -3.5 0 0 0 3 4-4con3.dat
Reply
RE: 17348 MINI FIGURE HAT, NO. 23 pattern
#6
If we put the head into the file,
Code:
1 1 0 0 0 1 0 0 0 1 0 0 0 1 3626.dat

we can see that we have some work to do, everywhere we see the blue head, the geometry needs to be adapted to properly fit
[attachment=11047]

The head is basically a cylinder with a radius of 13 LDU so we can work with a mock-up.
We do not need to modle the torus of the head-shape as most parts simply don't use it as well, we can use cones that will fit our purpose. Namely a con3 and a con12 which get us to the 13 LDU radius. In order to fit the torus of the head we need to extend the cylinder a bit.

Code:
1 14 0 17 0 13 0 0 0 -15 0 0 0 13 4-4cyli.dat
1 14 0 2 0 1 0 0 0 -3 0 0 0 1 4-4con12.dat
1 14 0 -1 0 3 0 0 0 -3.5 0 0 0 3 4-4con3.dat


.png   11_Head.PNG (Size: 25.38 KB / Downloads: 118)
We see the yellow mock-up that we will use as inside face, eveything above can be removed. Select lines, cond-lines and faces accordingly.

I have hidden the mock-up and activated the cond-line viewing mode to see if all irrelevant geometry has been removed:
   
Reply
RE: 17348 MINI FIGURE HAT, NO. 23 pattern
#7
Now this is the line where all faces needs to meet our adapted interior, we might need to add faces:
Code:
1 14 0 2 0 13 0 0 0 -15 0 0 0 13 4-4edge.dat

but let's check if there are still vertices inside the head by showing th ecylinder again:
Code:
1 14 0 17 0 13 0 0 0 -15 0 0 0 13 4-4cyli.dat

We see that where the hair splits, one vertex iswithin the head, we need to get it out:
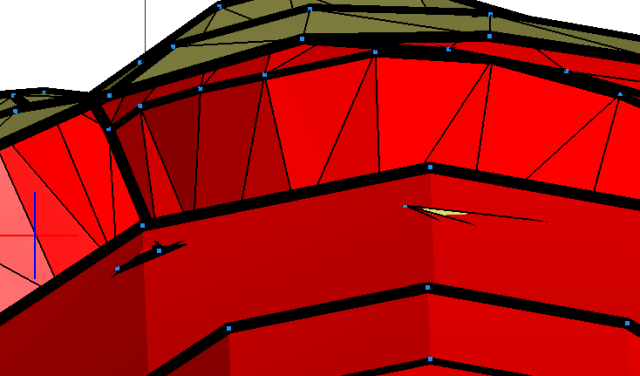
   

select the vertex and use "Actions" > "Merge To Nearest Edge"

.png   14_Head.PNG (Size: 50.2 KB / Downloads: 113)

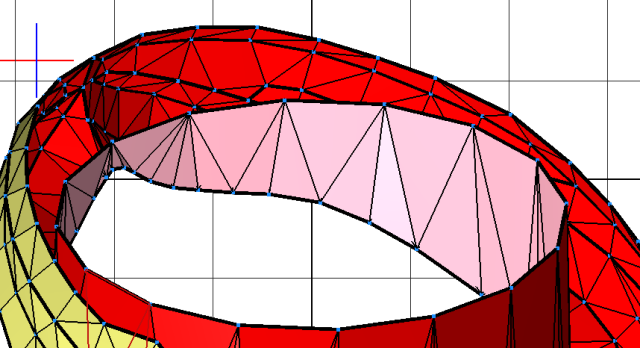
Now we remove the cylinder again and add the missing faces (here in pink). After cleaning up (swapping triangles, etc.) and verification with our cylinder that nothin intersects, it looks like this (stud is hidden as well)
   

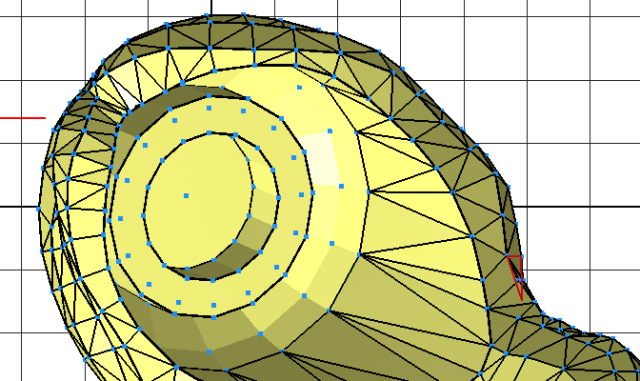
We now remove the edge, and unhide the con3 and con12 (and swap their BFC winding that the coloured surfaces point inside) and unhide the anti-stud and we get this:
   

Last step here is to regenerate the condlines: "Tools" > "Edger2"
- select "exclude Unmathced Edges"
- select Scope "File + Subfiles"
Let it run.
It will generate a few lines, in this case 85, ideally no edge line, if it did check for it an see if it is valid one can be a cond.


Attached Files
.dat   17348s01_step1.dat (Size: 186.84 KB / Downloads: 3)
Reply
RE: 17348 MINI FIGURE HAT, NO. 23 pattern
#8
NOw let's take a look at the outside of the s01 file to see if some triangles need to be flipped for a better look.

Some concave triangles might produce a bad look, e.g. those in pink:
   

Now always select them in pairs and press "F" to swap them, check the result how it looks

Here is my final file, feel free to use it and check it for further triangles that need to be swapped for the looks:


Attached Files
.dat   17348s01.dat (Size: 187.6 KB / Downloads: 2)
Reply
RE: 17348 MINI FIGURE HAT, NO. 23 pattern
#9
Here are the other two sub files


Now create the un-coloured part 17348.dat

Code:
1 16 0 0 0 1 0 0 0 1 0 0 0 1 s\17348s01.dat
1 16 0 0 0 1 0 0 0 1 0 0 0 1 s\17348s02.dat
1 16 0 0 0 1 0 0 0 1 0 0 0 1 s\17348s03.dat

and the coloured, 17348p01, keep the base colour in colour 16, i.e. in our case the hair

Code:
1 16 0 0 0 1 0 0 0 1 0 0 0 1 s\17348s01.dat
1 30 0 0 0 1 0 0 0 1 0 0 0 1 s\17348s02.dat
1 15 0 0 0 1 0 0 0 1 0 0 0 1 s\17348s03.dat


Attached Files
.dat   17348s03.dat (Size: 22.06 KB / Downloads: 3)
.dat   17348s02.dat (Size: 73.89 KB / Downloads: 2)
Reply
RE: 17348 MINI FIGURE HAT, NO. 23 pattern
#10
(2024-02-08, 14:59)Gerald Lasser Wrote: Here are the other two sub files


Now create the un-coloured part 17348.dat

Code:
1 16 0 0 0 1 0 0 0 1 0 0 0 1 s\17348s01.dat
1 16 0 0 0 1 0 0 0 1 0 0 0 1 s\17348s02.dat
1 16 0 0 0 1 0 0 0 1 0 0 0 1 s\17348s03.dat

and the coloured, 17348p01, keep the base colour in colour 16, i.e. in our case the hair

Code:
1 16 0 0 0 1 0 0 0 1 0 0 0 1 s\17348s01.dat
1 30 0 0 0 1 0 0 0 1 0 0 0 1 s\17348s02.dat
1 15 0 0 0 1 0 0 0 1 0 0 0 1 s\17348s03.dat

Thank you for all the explanations; I'll try to go through all the steps again to understand more, but I sense it's a very complex process, considering that just two weeks ago, I knew nothing about LDC
Reply
RE: 17348 MINI FIGURE HAT, NO. 23 pattern
#11
(2024-02-08, 17:17)Dario Folliero Wrote: Thank you for all the explanations; I'll try to go through all the steps again to understand more, but I sense it's a very complex process, considering that just two weeks ago, I knew nothing about LDC

You're welcome!

It might sound a bit terrifying at the beginning, but you will learn quickly what makes a good part. Feel free to ask questions and may be I will transfer this to a video tutorial as well for the benefit of other future authors!

BR

Gerald
Reply
RE: 17348 MINI FIGURE HAT, NO. 23 pattern
#12
Thank you, Gerald!

Excellent write up! I used this when making the Triceratops that I will probably post today.

Still learning your tribal language of primitives in Ldraw. Doesn't help with many years of experience in other 3d software as this is very specific for the format.

But content like this is perfect for learning!

-Fredrik
Reply
RE: 17348 MINI FIGURE HAT, NO. 23 pattern
#13
Perhaps I skipped a step, but when I compare the original with some my worls and your final file, I notice there are many more vertices. Where did these new vertices come from?
is compeltely different


Attached Files Thumbnail(s)
       
Reply
RE: 17348 MINI FIGURE HAT, NO. 23 pattern
#14
(2024-02-11, 18:31)Dario Folliero Wrote: Perhaps I skipped a step, but when I compare the original with some my worls and your final file, I notice there are many more vertices. Where did these new vertices come from?
is compeltely different

The meshes from digital-bricks are from early LDD data, which might be alread 10 years old. Some of those meshes have a better resolution in today's data from the Builder App, so I use the mesh with more details.
Reply
« Next Oldest | Next Newest »


Forum Jump:


Users browsing this thread: 7 Guest(s)