Solved Making stickers from scratch


RE: Making stickers from scratch
#51
   

* Delete:

1 16 17.5 -.25 17.5 1.5 0 0 0 1 0 0 0 1.5 1-4ndis.dat

it's no longer needed

* Add some empty lines above the cilinder prims to make some room for them
* Add the comment "0 // Thin box" to document your code a bit

https://www.ldraw.org/article/218.html#lt0

* Select the three cylinder prims, color them with 16 - Main color
* Copy & paste them, convert them to chord prims and start building the bottom of your sticker box
* The "problems" pane might warn you at some point about:

"The flat subfile is scaled in Y direction."

try figure out why.

* Draw quads between the cylinder prims. This is actually bad style 'cos it creats T-Junctions:

https://wiki.ldraw.org/wiki/T-Junction

on the other hand there is a clear edge and using tringles to connect all the vertices would result in long, stretched triangles - already mentioned above.

* Build also the bottom of the sticker with quads.

Screenshot
LEGO ergo sum
Reply
RE: Making stickers from scratch
#52
Every corner looks like this
   

And there are four long quads, connected like this (too large to show clearly)
   

On the bottom I used 2 "stripes" and one big quad
   

But the 2D bottom view reveals the pattern, no idea why
   

And the text editor


Now the problem "The flat subfile is scaled in Y direction."
So honestly I have no idea why was that, so I experimented with Y values, looking at the prim
   
Also I changed the Y to 0 (between +/- 17,5 X and Z values) because this surface was on the top, "melted" into the pattern, now it is on the bottom

For some reason the problem disappears when I set the chord value to Y=1
That is the point where I experimented with Y and because there are no visual changes, I can not see the difference and  understand what was the real reason

.jpg   Clipboard07.jpg (Size: 20.54 KB / Downloads: 152)
Reply
RE: Making stickers from scratch
#53
Setting Y=1 was the right thing to do: The standard value of the matrix. Sometimes copying and paste scaled cylinders or boxes or ... to get their position and size and converting it to a flat prim this error happens and people wonder why.


* Delete the 0 // Inlined: comments. They are no longer needed.
* Clean your code. It is good practis to group all conds at the bottom. Play with the Select... menu in the 3D Editor to select them all of them at once. Then cut and paste.

Time to BFC your sticker:

https://www.ldraw.org/article/415.html

* Select Green Frontfaces / Red Backfaces or alternativily Special Cond. Line Mode - in the 3D Editor
* All triangles, quads, prim with the wrong BFC winding show up red
* Select the triangles/quads/prim and hit Swap BFC Winding (J) in the - in the 3D Editor
* You could also rearrange the order of the triples in the Text Editor or for example mirror a prim via its matrix by working for example on the Y value by adding a minus:

1 16 -17.5 0 17.5 -1.5 0 0 0 -1 0 0 0 1.5 1-4chrd.dat

At the end of the process NO red triangles/quads/prim can be seen

Screenshot
LEGO ergo sum
Reply
RE: Making stickers from scratch
#54
Ok so now the model is fully green, no red surfaces visible
   
But the text editor is a bit messed now, after cut paste it is a bit harder to find something, but well, it works anyway.

I was more interested about that swap option, so I used the hide option and noticed that the model is green outside, but red inside. Every traingle/quad/prim is red and green, but the green must be outside Smile
Reply
RE: Making stickers from scratch
#55
   

Your sticker is now complete. What comes next is a beauty pass and error checking.

Some of your curves are still a bit edgy. Those should have been corrected in LDPC but then you would not learn how to move vertices in LDPE.

* Make sure you are in top view - in the 3D Editor
* Make sure Move Adjacent Data (B) is on - in the 3D Editor
* Click Move the Manipulator to Origin - in the 3D Editor
* Click Orient the Manipulator to World - in the 3D Editor
* Select Fine for the Snapping Grid - in the 3D Editor
* Select Vertex Mode (F2) - in the 3D Editor
* Click the Select (1) icon - in the 3D Editor
* Select the vertex you wanna manipulate
* The Data vertex: dialog pops up showing the values of the vertex
* Click the Move (2) icon - in the 3D Editor
* Click Move the Manipulator to the Nearest Vertex - in the 3D Editor

Your manipulator will jump to the selected vertex.

* Hovering over the arrows of the manilpulator they will change color to yellow. In this very moment you can move the mouse to left/right or up/down based on the axes you are working on to move your vertex

* Keep an eye on the Data vertex: dialog. If after the manipulation Y is something rather than -0.25 something went wrong with the plane you working on.

I hope you realized how convenient is is to do all the tweaking right in LDPC.

Smooth out all other edgy vertices. For example:

13.7186 -.25 4.363667
-13.9074 -.25 1.922167
-15.9594 -.25 -9.325833
-10.5729 -.25 10.84267

Screenshot
LEGO ergo sum
Reply
RE: Making stickers from scratch
#56
I understand this moving vertex/point, it feels familiar, I remember it from Part Creator where I had to do it anyway. Here I tried to smooth some edges, but avoid to change the surface too much. Could it be better? Of course! Maybe with more vertex points. All in all it still looks nice
   
   
Reply
RE: Making stickers from scratch
#57
   

The next step is by no means a requirement but good style - grouping colors:

* Select a triangle/quad/prim of the color less used - in the 3D Editor (at least I sort by this criteria)
* Select Select -> All with Same Colors - in the 3D Editor
* Cut - in the 3D Editor
* Add a comment in the Text Editor with the color you just picked
* Paste just below the new comment - in the Text Editor
* Repeat for the other colors

Speaking of colors I'd like you to double-check that 72 - Dark Bluish grey is actually dark bluish and NOT 80 - Metallic Silver? Does it have a shining coating? Otherwise you have to change that color or your part will be HOLD voted

Checking for gaps in your pattern

* Go the the bottom of the Text Editor and add a few blank lines. This will ease finding the code added by Edger2 which will be deleted after the check
* Make sure Insert Objects Behind The Cursor Position (Text Editor) is NOT activated - in the 3D Editor
* Select Tools -> Edger 2 - in the 3D Editor.
* In the dialog select Unmatched Edges Only. Since edges are not allowed in flat stickers:

https://www.ldraw.org/article/512.html#sticker_geo

we "abuse" Edger to find errors in the mesh.
* Tick Verbose to get immediate feedback.
* Edger will add the unmatched edges at the bottom of the Text Editor. There will be a lot at the borders where you added the quad - willingly creating T-Junk.
* You could experience that LDPE is not properly working or at least that the Text Editor does not accept any commands after running Edger2. Just Save in the Text Editor and everything should be back to normal.
* Beside flagging the T-Junk unfortunately Edger found also these:

2 4 12.6546 -.25 10.97567 9.681098 -.25 10.45317
2 4 9.662098 -.25 10.46267 12.6546 -.25 10.97567
2 4 9.681098 -.25 10.45317 6.707598 -.25 9.864167
2 4 6.707598 -.25 9.864167 9.662098 -.25 10.46267


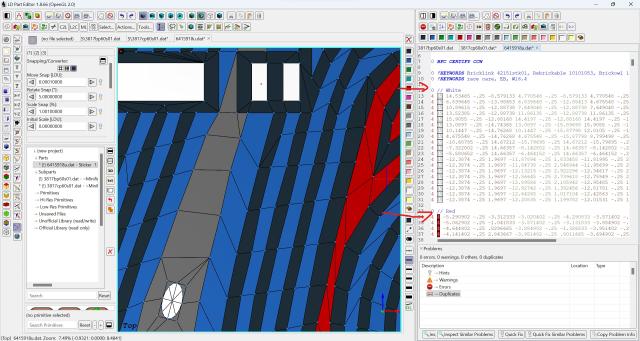
* Zooming in very closely you'll see that there is a gap.
* Select Line Size 0 to hid the red edges and see shining through the 16 - Main Color bottom of the sticker. Switch to BFC view mode to see the red among the green quads.
* Select the two vertices in question:

9.662098 -.25 10.46267
9.681098 -.25 10.45317

* Select Actions -> Merge To Average (CRTL+W)
* Your gap should be closed
* Delete all unmatched edges at the bottom of the Text Editor

Screenshot
LEGO ergo sum
Reply
RE: Making stickers from scratch
#58
I don't get it
Let's analyze:

"* Edger will add the unmatched edges at the bottom of the Text Editor. There will be a lot at the borders where you added the quad - willingly creating T-Junk."

Yes, over 100


"* Beside flagging the T-Junk unfortunately Edger found also these:
2 4 12.6546 -.25 10.97567 9.681098 -.25 10.45317
2 4 9.662098 -.25 10.46267 12.6546 -.25 10.97567
2 4 9.681098 -.25 10.45317 6.707598 -.25 9.864167
2 4 6.707598 -.25 9.864167 9.662098 -.25 10.46267"


Okay, but I can't find them


"* Zooming in very closely you'll see that there is a gap."

No, I don't see any gap, maybe because it is too dark or too small. Here I preview it in red/green surfaces, maximum zoom. In normal view it is also not visible


"* Select Line Size 0 to hid the red edges and see shining through the 16 - Main Color bottom of the sticker. Switch to BFC view mode to see the red among the green quads."

Ok so in size 1 it is visible
   

Select 0 - ok, hidden. But where is the shining?
   

Maybe bottom view? Nope
   

BFC view? Also nothing, from all sides, and not even in maximum zoom (see it before)
   

So I can't select the vertices to merge them
Reply
RE: Making stickers from scratch
#59
(2023-04-02, 11:44)Willy Tschager Wrote: Speaking of colors I'd like you to double-check that 72 - Dark Bluish grey is actually dark bluish and NOT 80 - Metallic Silver? Does it have a shining coating? Otherwise you have to change that color or your part will be HOLD voted

In this sticker it looks like dbg, I have the physical sticker sheet
   

However, stickers 10 and 11 have silver parts. I am not sure is it Metalic Silver or other metalic, but there is shiny part for sure
   
Reply
RE: Making stickers from scratch
#60
(2023-04-02, 16:17)Paweł Turalski Wrote: I don't get it
Let's analyze:

As I worked on your file it could be that I messed up something and that your .dat is different from mine. To be on the same page just post your .dat here.

You've posted pictures of the borders, but the gap at least I see is right in the middle. Once you have submitted your sticker to the PT learn that we communicate errors mostly by highlighting them via edges:

2 4 12.6546 -.25 10.97567 9.681098 -.25 10.45317
2 4 9.662098 -.25 10.46267 12.6546 -.25 10.97567
2 4 9.681098 -.25 10.45317 6.707598 -.25 9.864167
2 4 6.707598 -.25 9.864167 9.662098 -.25 10.46267

* Copy the code to the Text Editor
* Select Show Selection - in the Text Editor
LEGO ergo sum
Reply
RE: Making stickers from scratch
#61
(2023-04-02, 16:23)Paweł Turalski Wrote: In this sticker it looks like dbg, I have the physical sticker sheet

As you have the physical sticker I'm fine with that. I just pointed to it 'cos a mismatch between:

14 - Yellow and 82 - Metallic Gold
72 - Dark Bluish Grey and 80 - Metallic Silver

is a common error authoring stickers.

You could even add a note below the BFC line:

0 // Dark Bluish Grey is actually Dark Bluish Grey. Checked with physical sticker.
LEGO ergo sum
Reply
RE: Making stickers from scratch
#62
(2023-04-02, 16:17)Paweł Turalski Wrote: No, I don't see any gap, maybe because it is too dark or too small. Here I preview it in red/green surfaces, maximum zoom. In normal view it is also not visible

If it's too dark, try rotating the part ... or ... doubleclick on the area in the 3D editor, especially when zoomed in all the way.
LEGO ergo sum
Reply
RE: Making stickers from scratch
#63
   

Finish line:

* CTRL+Click on the Round icon - in the Text Editor
* Make sure Coordinate Precision = 3, Transformation Matrix Precision = 5:

https://www.ldraw.org/article/512.html#precision

* Select everything in the Text Editor
* Click on the Round icon - in the Text Editor
* Save either in the 3D Editor or the Text Editor

You should actually save often and add version numbers or dates to your filename instead of overwriting the same file time and again. Sometimes an backup comes handy.

* Close your file
* Close LDPE
* Start DatHeader:

https://ldraw.heidemann.org/index.php?page=datheader


* Load your file
* Scan for all errors
* It will take a while and it will report all your T-Junk which you can casually ignore. I find it surprising that DatHeader didn't complain about the "ł" the Paweł. We'll see what the PT has to say about.

As there aren't apparently no errors your file is ready for the PT - taking for granted you have signed the CA and have gotten submission privileges. Don't be surprised if a myriad of issues pop up once the sticker is on the PT. Different reviewers have different opinions on certain things an focus on different requirements.

Time for my fellow authors and reviewers to: "Speak now or forever hold your peace".

w.
LEGO ergo sum
Reply
RE: Making stickers from scratch
#64
(2023-04-03, 8:48)Willy Tschager Wrote: As I worked on your file it could be that I messed up something and that your .dat is different from mine. To be on the same page just post your .dat here.

You've posted pictures of the borders, but the gap at least I see is right in the middle. Once you have submitted your sticker to the PT learn that we communicate errors mostly by highlighting them via edges:

2 4 12.6546 -.25 10.97567 9.681098 -.25 10.45317
2 4 9.662098 -.25 10.46267 12.6546 -.25 10.97567
2 4 9.681098 -.25 10.45317 6.707598 -.25 9.864167
2 4 6.707598 -.25 9.864167 9.662098 -.25 10.46267

* Copy the code to the Text Editor
* Select Show Selection - in the Text Editor
Actual dat file:

.dat   6415918u.dat (Size: 65.52 KB / Downloads: 3)


I used the code and yes, I saw the gap, and fixed it. Similarly with other gaps on the top. Now it shows the edges as gaps, I guess it should be deleted in text editor (in the dat file here, the gap edges are still there)
   
Reply
RE: Making stickers from scratch
#65
(2023-04-03, 9:24)Willy Tschager Wrote: * Load your file
* Scan for all errors
* It will take a while and it will report all your T-Junk which you can casually ignore. I find it surprising that DatHeader didn't complain about the "ł" the Paweł. We'll see what the PT has to say about.

As there aren't apparently no errors your file is ready for the PT - taking for granted you have signed the CA and have gotten submission privileges. Don't be surprised if a myriad of issues pop up once the sticker is on the PT. Different reviewers have different opinions on certain things an focus on different requirements.

Time for my fellow authors and reviewers to: "Speak now or forever hold your peace".

w.
 Scanned, here is the result:

.png   Zrzut ekranu 2023-04-03 201959.png (Size: 16.07 KB / Downloads: 125)
Found 3 errors, but no fauls. That's confusing a bit


Quick test
   

But that's weird I can change the color of the edge
   
Reply
RE: Making stickers from scratch
#66
(2023-04-03, 17:51)Paweł Turalski Wrote: Actual dat file:


I used the code and yes, I saw the gap, and fixed it. Similarly with other gaps on the top. Now it shows the edges as gaps, I guess it should be deleted in text editor (in the dat file here, the gap edges are still there)

* Delete all unmatched red edge lines at the bottom of your file
* Some of your code is rounded to 3 digit some (Main color) is not
* What you labeled "0 // Edge" are actually "0 // Conditional lines"
* There is a vertex in the middle of nowhere:

2 10 15.334 -.25 4.554 15.543 -.25 4.516

Use:

* Actions -> Merge To Last Selected Vertex by selecting:

15.334 -.25 4.554

last.

* This:

2 5 5.093 -.25 9.171 8.935625 -.25 10.2905

looks odd. Use:

* Actions -> Split after having selected the two vertices. Rearrange to something like this:

2 9 5.093 -.25 9.171 6.728 -.25 9.812
2 9 6.728 -.25 9.812 9.646 -.25 10.503
2 9 9.646 -.25 10.503 12.611 -.25 11.034
2 9 12.611 -.25 11.034 19 -.25 12.04

* There are more areas which should be sanded. Most notably this:

2 2 9.235 -.25 2.958 10.9891 -.25 3.6376
2 2 10.9891 -.25 3.6376 12.75 -.25 4.069
2 2 12.75 -.25 4.069 13.8111 -.25 4.3199
2 2 13.8111 -.25 4.3199 15.334 -.25 4.554
LEGO ergo sum
Reply
RE: Making stickers from scratch
#67
(2023-04-03, 18:28)Paweł Turalski Wrote: Found 3 errors, but no fauls. That's confusing a bit

* Your problem is the header. As I already told you, your description is missing the TWO leading spaces:

https://www.ldraw.org/article/398.html#gendesc

not like this:

0 Sticker_1.9 x_1.9 with Bugatti Track Map

but:

0 Sticker_ _1.9 x_ _1.9 with Bugatti Track Map

* In DatHeader select:
* Option -> Preferences
* Tick detect t-junctions to find all the T-junk in your work

(2023-04-03, 18:28)Paweł Turalski Wrote: But that's weird I can change the color of the edge

* Sure. Stickers are no different from parts. They can be colored based on the color of the sticker sheet. Say white for probably most stickers, but also transparent for stickers on a transparent sheet. Read:

https://www.ldraw.org/article/512.html#sticker_geo
LEGO ergo sum
Reply
RE: Making stickers from scratch
#68
* Once your sticker is ready, please submit to the PT. Did you already apply for author status?
* As you have the physical sticker and the reviewer prolly have not, it is nice to upload a hires scan to a webspace and post the link along with the part in the PT.
* Feel honored if your parts get reviewed immediately, be patient if it doesn't get attention. There are currently 4000 files a the PT in various states of certification and we are just a bunch of reviewer. Go to the:

https://library.ldraw.org/tracker/weekly

page and select:

Oldest first

to find out that some parts are stuck there since 2006.
* Do NOT abandon your part. If you do, someone (mostly the core members) will have to step in and ultimately fix it, dragging workforce from reviewing or authoring. (Beside that it is no fun fixing other peoples mess). Fix your part immediately after getting email notification with a HOLD.

Leg godt!

w.
LEGO ergo sum
Reply
RE: Making stickers from scratch
#69
(2023-04-04, 11:54)Willy Tschager Wrote: * In DatHeader select:
* Option -> Preferences
* Tick detect t-junctions to find all the T-junk in your work
In lines 849-852 there are a lot of T-junks, for some reason the same value is shown for many times (for other lines too)

Here is the result:


So I checked where is the problem, and it is in all side rectangles. Now how to fix it? Maybe make more rectangles instead of long stripes like it is?
   
Reply
RE: Making stickers from scratch
#70
I don't want to waste my time so now I'm going to try to make the next simple flat sticker, based on the content here Smile
   

But is it the end? No!
After that, I want to learn more!
- stickers on unusual shapes
- adding new parts to the Pattern Creator
- formed sitckers
- prints on curved shapes (especially 89679pr0003)

The more I do the more I know
Reply
RE: Making stickers from scratch
#71
(2023-04-04, 17:43)Paweł Turalski Wrote: So I checked where is the problem, and it is in all side rectangles. Now how to fix it? Maybe make more rectangles instead of long stripes like it is?

No fix it at all. I prefer T-junk over a myriad of long streched triangles which add no value.

w.
LEGO ergo sum
Reply
RE: Making stickers from scratch
#72
(2023-04-04, 17:58)Paweł Turalski Wrote: I don't want to waste my time so now I'm going to try to make the next simple flat sticker, based on the content here Smile

Are you sure you don't wanna use discs and rings:

* Tools -> Rings and Cones for that.

Anyway, study other peoples work, try to find out things and functions on your own. Search the forum. Come back when you're stuck.

(2023-04-04, 17:58)Paweł Turalski Wrote: The more I do the more I know

The more you know the more you forget.

w.
LEGO ergo sum
Reply
RE: Making stickers from scratch
#73
(2023-04-04, 12:15)Willy Tschager Wrote: * Once your sticker is ready, please submit to the PT.

Hey Paweł ,
It's been interesting to read about the development of this sticker. I have 2 suggestions.

In one corner of the pattern there is a 1-4chrd due to the design of the pattern.
I would like to see the same, 1-4chrd, used in the other 2 black corners. Replace the 1-4disc with 1-4chrd, and adjust the surface.
This removes a rather useless vertex in each corner.

The other issue is a bit more tricky to understand.
In the forth corner you have inlined the primitives, the cyli and top and bottom chrd, due to the pattern design. Blue and black.
A trick to use here is to use 2 other primitives, like this:
1 0 17.5 -.25 17.5 0 0 1.5 0 1 0 1.5 0 0 3-16chrd.dat
1 1 17.5 -.25 17.5 1.5 0 0 0 1 0 0 0 1.5 1-16chrd.dat
and add the cyli and the bottom chrd. Note the colour of these 2 primitives.

The 1-16chrd is difficult to understand, since it is completely invisible in LDPE. It doesn't countain any surface or triangle.
All you might see in LDPE is a single vertex at the origin of that primitive. Select it in the text editor, and look in the 3D view.
You will also see a warning "Empty subfile", but you can ignore that.

The 1-16chrd is there only to give instructions to other software that are able to "create" a blue triangle when your design is showed in higher resolution. Test this by viewing your design in LDView and turn on "Primitive Substitution".
LDView/Edit/Primitives/Primitive Substitution. Adjust the Curve quality.
No primitive "substitution" is actually made. This is all done by some mathematical magic.
Reply
RE: Making stickers from scratch
#74
That was a bit more challenging, but it has been fixed ( I think?)


 Now how can I update the file? I don't see any option to edit part page, or upload the file from review/comment section
Reply
RE: Making stickers from scratch
#75
(2023-04-05, 18:03)Paweł Turalski Wrote: Now how can I update the file? I don't see any option to edit part page, or upload the file from review/comment section

Just resubmit with the replace existing file check box checked.
Reply
RE: Making stickers from scratch
#76
Now that Paweł has his part on the PT and before this thread fades too far into the distance:

I'd like to thank everyone on this thread for their friendly attitude and willingness to teach a newcomer. It's things like this that make being part of this community rewarding.
Reply
RE: Making stickers from scratch
#77
JC Tchang made a commented summary of this thread that can be used as a tutorial... It's written in French, but modern automatic translation tools should be up to the task Wink
https://jc-tchang.philohome.com/manuel/sticker_tut.htm
Reply
RE: Making stickers from scratch
#78
Hello guys, I'm back!
After making that sticker I was a bit busy and I was working on my own 42151 alternate where I used the printed part 89679 - this is what I came for.
This part is not available so I wanted to make it. The set 42151 (and now also 42162) is quite popular and I used it in my own alternate build - it is visible so I want to use the printed part in digital model, especially for renders. 

This is my strategy what and how I wanted to do:

I found the Bugatti logo as dat file, but I changed the ring to white and EB letters to black - exactly like the part has.
   

Copy the text of the logo file...
   

...and paste under the panel. I used the move and rotate tools to move it here. My idea is to delete this "wall", put the logo, and fill the gaps on sides.
   

But how to do it? I do not know the angle, or how to find the midpoints, or maybe there is another (easier?) way to do it.
I'm sure that some designers will use this part in their creations, let's make it possible!

And offtop - this is where I used the part in my alternate build and why I want to get it Wink
I have to make the digital model so I have some time
   
Reply
RE: Making stickers from scratch
#79
(2023-06-13, 16:33)Paweł Turalski Wrote: But how to do it? I do not know the angle, or how to find the midpoints, or maybe there is another (easier?) way to do it.
I'm sure that some designers will use this part in their creations, let's make it possible!

I'm sure someone would tell you how to calculate the correct angle, but that's not me.
I would use a more brutal approach.
  • Select all the triangles in the logo you want to adapt.
  • Move and rotate them roughly into the position you want.
  • And then "project" them to the surface, using "Merge to Nearest Face" under "Actions".
  • Remove the "wall" and fill in the missing surface.

This works well if your surface, the "wall", is a single bigger quad. If the "wall" is divided into many smaller triangles, a shaped surface, it gets trickier and you need to use another method.

Would this work in this case?
Reply
RE: Making stickers from scratch
#80
I did it in exactly this way and it works! No errors or warnings. I used the measure tool and manually calculated how should I "extend" the corners of the logo to fit it into the panel. So the panel is 20 ldu wide, but the logo file is 15,3 ldu. In short I moved each corner 2,35 ldu. There are quite a lot of triangles now, the program somehow found the angle.
   

No red sides
   

Normally works in Ldview and Ldcad


I think there are some mistakes so the part is not enough good for share, but for me it is ok to use in my project.
And how to create the part header? I mean copyrights or something, because the panel is made by Gerald Lasser and Bugatti logo by Massimo Maso - I just took both files and combined into one.
Reply
RE: Making stickers from scratch
#81
(2023-06-14, 17:27)Paweł Turalski Wrote: And how to create the part header? I mean copyrights or something, because the panel is made by Gerald Lasser and Bugatti logo by Massimo Maso - I just took both files and combined into one.

To me it sound like you've done all that needs to be done.

You have a file, using the correct subfile, no surface is inverse.
Save the file as 89679pt1. There is already a 89679pt0 with the Ferrari logo.
The header is standardized so all you need to do is to give it a good description, and put your name as author.
You are the creator of this file. Not Gerald or Massimo.
Add some reference set numbers and keywords.
Clean the code using DATHeader.
Upload.
Reply
RE: Making stickers from scratch
#82
File shared, I am sure that designers wll find cool ways to use it in their projects. Part file is here: https://library.ldraw.org/tracker/32037

Bonus - works in Lpub3d too
   
Reply
« Next Oldest | Next Newest »


Forum Jump:


Users browsing this thread: 1 Guest(s)