Rotation & angle of universal joint?


Rotation & angle of universal joint?
#1
Since I got such quick and helpful advice on my piston rod question, here is my next challenge: universal joints!

Specifically, how do I work out the compound angles of a double u-joint connection? See the image below, where I need to connect axle A to axle B by using the short connecting axle that's floating nearby.
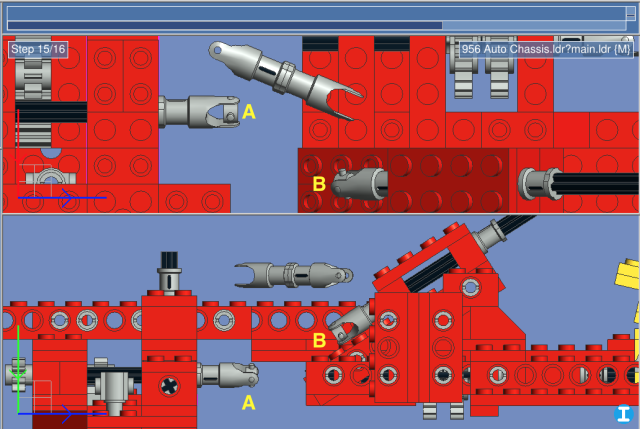
   

Here are some parameters:
  • Axle A is oriented parallel the model's Z axis; axle B is oriented at an angle to it. The connector will have to be rotated in both the X and Y directions, but you can't just set one and then the other, because changing either affects both. I'm guessing the 't' word, trigonometry, will come in again here, but because of the compound angle, I'm not sure where to place the triangles.
  • Axles A and B are rotated 22.5 degrees with respect to their longitudinal axes; my assumption is that the U-joint will transmit the same angle to the connector axle, and that while this rotation needs to be accounted for, it won't change the method needed to determine the connector angle.
  • I guess I need to determine the rotation of the U-joint hubs at A and B, around both of their local X and Y axes. Again, my assumption is that the hubs themselves, however they may be rotated, will always remain at the same coordinates in absolute space; that is, they always form the point around which the connector axle is angled at each end.
  • The end of the axle at B may need to be slid downward along its own longitudinal axis in order to correctly intersect the connector axle; this unknown position makes the trigonometry harder to figure out for me.
Of course, I can (and probably will) just download this model from the OMR and steal the answers from there, but again, I'm keen to know the right way to solve these challenges on my own. And I could also probably work it out by iteratively tweaking each angle until everything appears to line up, but I like to know that I've actually calculated it precisely instead of just doing it by eye.

Looking forward to everyone's suggestions!
Reply
RE: Rotation & angle of universal joint?
#2
[Image: thinking-face_1f914.png]
I managed to come to a working method, but it is based on a successive approximation method, far from optimal... (attached).
Note that I haven't found the 853/956 Auto chassis on the OMR, but it's available on Eurobricks. Needed it for basic geometry... but the universal joints are slightly wrong there, the middle connections are badly placed.


Attached Files
.ldr   Auto.ldr (Size: 1.09 KB / Downloads: 4)
Reply
RE: Rotation & angle of universal joint?
#3
Lightbulb 
(2019-10-02, 3:36)N. W. Perry Wrote: Since I got such quick and helpful advice on my piston rod question, here is my next challenge: universal joints!

Specifically, how do I work out the compound angles of a double u-joint connection?

I would recommend use FLOSS parametric 2D/3D CAD & CAE «SolveSpace» for analyze 2D & 3D mechanism/kinematic: I try recreate all needed parts for creating universal joint assembly from scratch as solid CAD models in SolveSpace.
  • "Technic Universal Joint End (3712.slvs)" done!
    [Image: g78ZGba.png]
  • "Technic Universal Joint Centre Type 1 (3326a.slvs)" done!
    [Image: lHBXfV9.png]
  • WIP!
Reply
RE: Rotation & angle of universal joint?
#4
The other thing compounding this issue is that real plastic is flexible and digital brick are not. This means that what fits in real life may not on your computer. The single angle u-joints often are off by a few ldu, the double angle u-joints often have a significant length gap.
Reply
RE: Rotation & angle of universal joint?
#5
(2019-10-02, 3:36)N. W. Perry Wrote: Since I got such quick and helpful advice on my piston rod question, here is my next challenge: universal joints!

I don't have the time to go in to details at the moment, but you might want to look at my 8860 animation script (included in LDCad's examples).

It does realtime frame depended universal placements.

Code section of interest:

Code:
    --The universal joints are a bit tricky and need some rotation matrix 'magic'.
    -- As there are two of them a function can be used to apply things on both of them.
    -- This uses the source's known local X and Z axis' to construct the link's orientation by using the also known destination Z-axis (axle length direction).
    -- The orientation of the destination can then be constructed based upon the link's orientation.
    -- We don't have to worry about positions in absolute model space as the aniTools joint mechanics will take care of that.
    local function calcUniAxle(fromAxleOri, dstAxleZ, linkPosOri, dstAxlePosOri)

      --link
      local jntX=fromAxleOri:getOriRow(1)
      local jntZ=fromAxleOri:getOriRow(3)
      local jAngle=jntX:getSignedAngle(dstAxleZ, jntZ)

      local ori=ldc.matrix()
      ori:setRotate(jAngle, jntX)
      jntZ:transform(ori)

      local jntY=jntZ:getCross(jntX)
      ori:setOriRows(jntX, jntY, jntZ)
      ori:mulAB(fromAxleOri:getInvertedOri())
      linkPosOri:set(ori)

      --dst
      jAngle=jntY:getSignedAngle(dstAxleZ, jntZ)
      ori:setRotate(jAngle, jntY)
      jntZ:transform(ori)
      jntX=jntY:getCross(jntZ)
      dstAxlePosOri:setIdentity()
      dstAxlePosOri:setOriRows(jntX, jntY, jntZ)
    end

    local z=self.axle1Joint.orgAbsPosOri:getPos()-self.axle3Joint.orgAbsPosOri:getPos()
    calcUniAxle(self.axle3PosOri.value, z, self.axleJnt2PosOri.value, self.axle2PosOri.value)

    z=self.axle1Joint.obj:getOri():getOriRow(3)
    calcUniAxle(self.axle2PosOri.value, z, self.axleJnt1PosOri.value, self.axle1PosOri.value)
Reply
RE: Rotation & angle of universal joint?
#6
(2019-10-02, 11:33)Philippe Hurbain Wrote: [Image: thinking-face_1f914.png]
I managed to come to a working method, but it is based on a successive approximation method, far from optimal... (attached).
Note that I haven't found the 853/956 Auto chassis on the OMR, but it's available on Eurobricks. Needed it for basic geometry... but the universal joints are slightly wrong there, the middle connections are badly placed.

So, what you're saying is…this one actually is as tricky as it seems?  Tongue

There is also an 853 model at Technicopedia; it looks to be a different one from the Eurobricks model, but your own solution looks at least as accurate!
(2019-10-02, 14:05)Orion Pobursky Wrote: The other thing compounding this issue is that real plastic is flexible and digital brick are not. This means that what fits in real life may not on your computer. The single angle u-joints often are off by a few ldu, the double angle u-joints often have a significant length gap.

This model actually has a few such instances, as do some others from that early Expert Builder period, where connections are made that depend on the natural tolerance of the plastic and the spaces between bricks. I've been meaning to ask in another thread how others have gone about modeling these instances (for example, in the 850 Fork Lift, I made my own custom 2x2 brick that is 1 LDU too short and mixed it in with proper-sized ones, to allow a connection with one beam that's misaligned with another).

(2019-10-02, 18:17)Roland Melkert Wrote: I don't have the time to go in to details at the moment, but you might want to look at my 8860 animation script (included in LDCad's examples).

It does realtime frame depended universal placements.

I actually looked at the 8860 script for piston rod/crankshaft placement as well. I recognize that the answer is in there somewhere, but I will probably need some help translating what I'm reading there.  Wink

Meanwhile, I'll see how close I can get with successive approximation—I'll probably try setting the angles in Bricksmith, since I can repeatedly apply an incremental rotation of my choosing until it's as close as can be.
Reply
RE: Rotation & angle of universal joint?
#7
(2019-10-03, 1:47)N. W. Perry Wrote: This model actually has a few such instances, as do some others from that early Expert Builder period, where connections are made that depend on the natural tolerance of the plastic and the spaces between bricks. I've been meaning to ask in another thread how others have gone about modeling these instances (for example, in the 850 Fork Lift, I made my own custom 2x2 brick that is 1 LDU too short and mixed it in with proper-sized ones, to allow a connection with one beam that's misaligned with another).

I usually just push the connecting axle further into u-joint ends. As long as the error isn't more than 10-15 ldu then its fine and you'd never know since the parts aren't transparent. See my 8448 model for an example.
Reply
RE: Rotation & angle of universal joint?
#8
(2019-10-03, 1:47)N. W. Perry Wrote: I actually looked at the 8860 script for piston rod/crankshaft placement as well. I recognize that the answer is in there somewhere, but I will probably need some help translating what I'm reading there.  Wink
Ok, I had some time to kill (waiting on some progress bar Smile )

I made a very quick and dirty helper macro and added it to the technic.lua script.

Replace
%appdata%\LDCad\scripts\default\global\technic.lua
with the version attached.

Now in your model start a new selection
Select the universal end at A
then (hold ctrl) select the center piece at a (or anywhere)
then (hold ctrl) select the joints second uni end (or one anywhere else)
last (hold ctrl) select the uni end at point B

now execute the new macro from /scripts/technic/Universal joint placement helper

this should place all three uni parts correctly.

Now repeat this for the uni at point B by selecting
uni part at B' axis
center part
another uni part end
center piece at point A

execute the script again.

Made a short clip:
https://youtu.be/ZhCQrLSCNwI


Notes:
It only works with uni ends with an origin at the center piece (like 62520.dat)
I did very little testing.


Attached Files
.zip   technic.zip (Size: 2.37 KB / Downloads: 12)
Reply
RE: Rotation & angle of universal joint?
#9
(2019-10-03, 22:27)Roland Melkert Wrote: Notes:
It only works with uni ends with an origin at the center piece (like 62520.dat)
Not a huge restriction, to use universal joint ends with stupid origin (3712 and 575) you only have to translate them by 30 ldu to place their origin at the right place, apply script, and re-translate them in opposite direction (using relative grid).

Quote:I did very little testing.
I indeed think there is something not addressed, configurations where one i/o axle needs to be rotated. If I am not utterly wrong, this occurs when input and output axle do not sit in parallel planes. See attached example.


Attached Files
.ldr   univjoint.ldr (Size: 580 bytes / Downloads: 2)
Reply
RE: Rotation & angle of universal joint?
#10
Yes—it does indeed work! I came up with the same workaround as Philo for the 4L U-joint; here's how it looks…

  1. First, install the U-joint parts onto the axle in the usual manner (without any rotation):
       
  2. Next, select the hub part and choose REL editing grid. Then, set the positions of the end parts to 0,0,0 (by removing the 30 LDU offset on the Z-axis):
       
  3. Apply the script:
       
  4. Now, move the end parts to their proper positions using part snapping or grid plane editing (making sure the the grid orientation is set REL to the axle, not the rotated hub):
       
Don't forget to add the 2L axle to the link section! Also, be careful to select the parts in the correct order when applying the script, as the end parts appear reversed from their eventual positions.

There is one tiny quibble with this solution: it doesn't allow placing the end parts tight together on the 2L link section, because that would require sliding the angled axle slightly downward, and we don't know that exact position. I can envision a new feature that would allow such a placement…but I'll post about that another time.  Wink
Reply
RE: Rotation & angle of universal joint?
#11
(2019-10-04, 7:23)Philippe Hurbain Wrote: Not a huge restriction, to use universal joint ends with stupid origin (3712 and 575) you only have to translate them by 30 ldu to place their origin at the right place, apply script, and re-translate them in opposite direction (using relative grid).

I indeed think there is something not addressed, configurations where one i/o axle needs to be rotated. If I am not utterly wrong, this occurs when input and output axle do not sit in parallel planes. See attached example.

That is because the input and output angle of universal joints are not (always) the same.

With the model I used in the YT clip the steering wheel was already rotated to compensate for this.

If that's not the case you should use (axle) snapping to work each joint from the previous one to account for the new rotation at each step.

As for the weird origins, for the final version I'll add information to the script so it recognize the joint parts in order to apply the corrections if needed.
Reply
RE: Rotation & angle of universal joint?
#12
(2019-10-04, 16:48)N. W. Perry Wrote: There is one tiny quibble with this solution: it doesn't allow placing the end parts tight together on the 2L link section, because that would require sliding the angled axle slightly downward, and we don't know that exact position. I can envision a new feature that would allow such a placement…but I'll post about that another time.  Wink
Yes, it would need a more specialized version of the script which does both joints in one go.

It should be possible by extending the steering wheel direction and finding the best intersection point on it instead of blindly using a point B.
Reply
RE: Rotation & angle of universal joint?
#13
Quote:With the model I used in the YT clip the steering wheel was already rotated to compensate for this.
And how do you know the needed rotation angle???


Quote:If that's not the case you should use (axle) snapping to work each joint from the previous one to account for the new rotation at each step.
Mmhhh... I tried that, but I can't seem to get the knuckles oriented right.
Reply
RE: Rotation & angle of universal joint?
#14
(2019-10-04, 18:09)Philippe Hurbain Wrote: And how do you know the needed rotation angle???
I think I applied the animation angles to the static model (right mouse menu in animation mode) at one point Smile

(2019-10-04, 18:09)Philippe Hurbain Wrote: Mmhhh... I tried that, but I can't seem to get the knuckles oriented right.
May try something like:

- Apply like above
- place the connecting axle, make sure it's snapped to the first joint (tmp hide the second one if needed)
- Select the center axle
- rel grid
- select the 2nd uni's first end
- ctrl+home
- rotate 90 deg to align with the axle again.
- reapply the script on the 2nd joint
- snap the steering wheel to the 2nd joint's 2nd end.
Reply
RE: Rotation & angle of universal joint?
#15
(2019-10-04, 17:46)Roland Melkert Wrote: Yes, it would need a more specialized version of the script which does both joints in one go.

It should be possible by extending the steering wheel direction and finding the best intersection point on it instead of blindly using a point B.

That's exactly what I'm thinking. I envision a feature I call "vector snapping"—it's similar to rotation snapping (as suggested here), but instead of finding the angle to snap to a nearby single part, it finds the intersection of two relative axes: that of the part/assembly being rotated, and that of another one nearby, allowing you to translate the second part/assembly along its own azimuth to intersect the one being rotated.

(I envision it as a snapping feature, but I suppose it doesn't have to be. You'd probably already know which second axis you want to align with, so you could just select the two axes and apply a function to find the intersection point.)
Reply
RE: Rotation & angle of universal joint?
#16
(2019-10-02, 11:33)Philippe Hurbain Wrote: Note that I haven't found the 853/956 Auto chassis on the OMR, but it's available on Eurobricks. Needed it for basic geometry... but the universal joints are slightly wrong there, the middle connections are badly placed.

Well, now that my model is finished, I'd be happy to submit it to the OMR. What do I need to do to make it compliant?


Attached Files
.mpd   956-1 - Auto Chassis - Main model.mpd (Size: 43.51 KB / Downloads: 3)
Reply
RE: Rotation & angle of universal joint?
#17
(2019-10-05, 1:53)N. W. Perry Wrote: Well, now that my model is finished, I'd be happy to submit it to the OMR. What do I need to do to make it compliant?

There's a tutorial on the wiki. It mostly involves using mpdcenter so if you haven't installed that that's a good first step.
Reply
RE: Rotation & angle of universal joint?
#18
(2019-10-05, 1:53)N. W. Perry Wrote: Well, now that my model is finished, I'd be happy to submit it to the OMR. What do I need to do to make it compliant?
I use LDCad for that. File -> cleanup. Here is the setup I apply...


Attached Files Thumbnail(s)
   
Reply
RE: Rotation & angle of universal joint?
#19
(2019-10-04, 18:24)Roland Melkert Wrote: - Apply like above
- place the connecting axle, make sure it's snapped to the first joint (tmp hide the second one if needed)
- Select the center axle
- rel grid
- select the 2nd uni's first end
- ctrl+home
- rotate 90 deg to align with the axle again.
- reapply the script on the 2nd joint
- snap the steering wheel to the 2nd joint's 2nd end.
Sorry, I don't get it... Problem is that I need to rotate an end joint unit, and I can't figure the needed rotation. The script only places and rotates knuckles and inner joint (next to center axle) units, not the end joint units.
Reply
RE: Rotation & angle of universal joint?
#20
(2019-10-05, 11:58)Philippe Hurbain Wrote: Sorry, I don't get it... Problem is that I need to rotate an end joint unit, and I can't figure the needed rotation. The script only places and rotates knuckles and inner joint (next to center axle) units, not the end joint units.
You don't need an angle, just apply the same orientation the script applied to the second universal end (or the axle snapped to it).

This is what the ctrl+home combined with the relative grid does in my above sequence.
Reply
RE: Rotation & angle of universal joint?
#21
(2019-10-06, 17:51)Roland Melkert Wrote: You don't need an angle, just apply the same orientation the script applied to the second universal end (or the axle snapped to it).

This is what the ctrl+home combined with the relative grid does in my above sequence.
Part of the problem is that I'm not sure what part/end we are speaking of...
Orange parts are the chassis, grey parts are properly placed (I am supposed to be after step "90 deg to align with the axle again."), but blue and white parts are not properly connected.
Maybe I'm dumb... Wink


Attached Files Thumbnail(s)
   

.ldr   univjoint.ldr (Size: 580 bytes / Downloads: 3)
Reply
RE: Rotation & angle of universal joint?
#22
(2019-10-06, 18:18)Philippe Hurbain Wrote: Orange parts are the chassis, grey parts are properly placed (I am supposed to be after step "90 deg to align with the axle again."), but blue and white parts are not properly connected.
Assuming the red axle is correctly snapped to the all grey universal joint:

Select red axle
Set rel grid
(single) Select the grey uni end (the one with the blue center)
ctrl+home (reset only ori to grid)
rotate it 90 deg as the axle is X oriented and the uni halves are Z oriented.
add the blue, white end and white axle to the selection
apply script
re snap the white axle to the white end.
Reply
RE: Rotation & angle of universal joint?
#23
(2019-10-06, 18:32)Roland Melkert Wrote: Assuming the red axle is correctly snapped to the all grey universal joint:

Select red axle
Set rel grid
(single) Select the grey uni end (the one with the blue center)
ctrl+home (reset only ori to grid)
rotate it 90 deg as the axle is X oriented and the uni halves are Z oriented.
add the blue, white end and white axle to the selection
apply script
re snap the white axle to the white end.
OK, it works Wink Problem iI had s that selection needed for the script reapply  is not similar to what we did before. Need to think a bit to really understand...
Reply
RE: Rotation & angle of universal joint?
#24
(2019-10-06, 19:02)Philippe Hurbain Wrote: OK, it works Wink Problem iI had s that selection needed for the script reapply  is not similar to what we did before. Need to think a bit to really understand...
The fist time you applied the script to: white end, blue center, grey end, grey center
That gave the correct positional information
The second time corrects the rotational parts of the center en white end based upon the red axle instead of the 'randomly' rolled white one.
Reply
RE: Rotation & angle of universal joint?
#25
(2019-10-06, 19:15)Roland Melkert Wrote: The fist time you applied the script to: white end, blue center, grey end, grey center
That gave the correct positional information
The second time corrects the rotational parts of the center en white end based upon the red axle instead of the 'randomly' rolled white one.
OK, get it. Phew Wink
Reply
RE: Rotation & angle of universal joint?
#26
Ah, time for using bold font on this forum...
Roland, thanks a lot for this script! Although it has some bugs (and it's UI is... eh... minimalistic? Wink ), it is a big help I had been waiting for, for a looong time. It motivates me to study the function source code and trying to create a similar function for two rotated beams connection. I hope I can save some time for it.

The above-mentioned bug report:
I followed all step of your "usage howto" in this thread and the script rotated not only the desired halves of uni-joint but the other ones as well, fortunately it was easy to fix (rotate them by 180°). See attached picture.
   

About UI:

1. in fact, the script/function is completely useless without this forum thread knowledge. For "production version", can you add a help message?
2. we can see here why I requested a feature of >1 selection(s) (i.e. different colors of selection highlight or a script asking interactively for each selection) - if impossible with LDCAD 1.6, may you think about it for 2.0, please?
Reply
RE: Rotation & angle of universal joint?
#27
(2019-10-22, 9:01)Milan Vančura Wrote: Roland, thanks a lot for this script! Although it has some bugs (and it's UI is... eh... minimalistic? Wink ), it is a big help I had been waiting for, for a looong time. It motivates me to study the function source code and trying to create a similar function for two rotated beams connection. I hope I can save some time for it.
It's not a quick and dirty version for nothing Smile

The core math comes from the 8860 animation and it only works with joint parts that are oriented in the Z direction.

(2019-10-22, 9:01)Milan Vančura Wrote: I followed all step of your "usage howto" in this thread and the script rotated not only the desired halves of uni-joint but the other ones as well, fortunately it was easy to fix (rotate them by 180°). See attached picture.
Don't know what goes wrong, I tried the same setup and it works for me. Just be sure a selection is the 3 joint parts and a destination point (usually the next joint's first part).

A script that does both in one go would be much better for these constructions otherwise you'll have to do one of the joints twice to correct for the roll difference (like discussed above).

Such a script would need a selection of all 6 joint parts and the destination axle.

You could also let it automatically add an axle with the correct length in the middle of the two joints.


(2019-10-22, 9:01)Milan Vančura Wrote: 1. in fact, the script/function is completely useless without this forum thread knowledge. For "production version", can you add a help message?
2. we can see here why I requested a feature of >1 selection(s) (i.e. different colors of selection highlight or a script asking interactively for each selection) - if impossible with LDCAD 1.6, may you think about it for 2.0, please?
1. I could add a message before execution, but that would be annoying once you know how it works.

2. 2.0 will indeed be much more integrated with the scripting engine.
Reply
RE: Rotation & angle of universal joint?
#28
EDIT: Never mind. Big Grin While reading through the script to figure out the necessary math, I noticed this line:
Code:
endCPosOri:mulRotateBA(90, 0, 0, 90) --optional

Commenting out that optional line made it unnecessary to rotate the end piece in the first place, so my question, while still of interest, now becomes purely academic.

(But why is the vector argument here 0, 0, 90 instead of 0, 0, 1 for the z-axis?) Huh


Follow-up question: Let's say I've applied the script (the improved one that now comes with LDCad, naturally) as above, and now I want to rotate one of the U-joints 90 degrees longitudinally—for example, so that the slots align on the center link?

It's easy enough to rotate the ends, just by changing signs and moving 1's around in the matrix. But how about for the center piece? That seems like it should be just as easy, but I can't work out the right process.

Theoretically, you could rotate the ends and then re-apply the script to just that one joint, but this seems to introduce slight misalignments that weren't present when applying the script to both joints at once. I'd like to retain the calculations done by the script the first time and just manually type in the 90 degree rotation.
Reply
RE: Rotation & angle of universal joint?
#29
(2021-08-22, 17:09)N. W. Perry Wrote: (But why is the vector argument here 0, 0, 90 instead of 0, 0, 1 for the z-axis?) Huh
Typo, the function will normalize it anyway Smile
Reply
« Next Oldest | Next Newest »


Forum Jump:


Users browsing this thread: 3 Guest(s)